If you're anything like me, when it comes to building VRML worlds I get lazy. One of the best ways to create simple worlds that look complex is to use textures. Texture mapping lets you take an image and paste it onto the surface of an object. VRML has a rich set of controls for adjusting that mapping but let's look at some of the simpler cases.
There are several types of textures nodes, ImageTexture, PixelTexture, and MovieTexture. The ImageTexture is defined as:
ImageTexture {
  exposedField MFString url     []
  field        SFBool   repeatS TRUE
  field        SFBool   repeatT TRUE
}
The url field let's you link to a file containing a image in JPEG, GIF or PNG format. Notice that the url is an MFString value meaning there can be a list of urls. The browser is supposed to treat the url's as a prioritized list, going from the highest to the lowest. This helps in cases of links that have gone stale as that tends to happen on the web.
The repeatS and repeatT fields direct the browser whether or not to repeat the texture in the s and t directions. S and T are the names of the texture coordinate system. S is the x direction and T is the y direction. Legal values are from 0.0 to 1.0 and the origin is at the lower left corner of the texture.
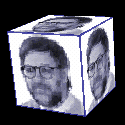
All of the texture nodes are used with the Appearance node. One of the three Texture nodes, would be the value of the texture field of the Appearance node. So let's look at a simple example. Let's look at a cube and how we would texture it with an ImageTexture.
First we need some geometry so let's start with a cube defined as:
Shape {
	geometry Box {}
}
That's not good enough however because we need to use the appearance field of the shape node because that's where the action is! Appearance nodes contain a field for textures. For those of you not used to creating VRML files here's your chance! Simply cut and paste the code that follows into a file with a .wrl extension and open it up with a Web browser that has a VRML browser plug-in installed. So now we have:
#-----cut from line below up until the cut mark------
#VRML V2.0 utf8
Shape {
   appearance Appearance {
	  texture ImageTexture {
		  url "http://web3d.about.com/library/
			   graphics/sandyicon.gif"
	  }
    }
	geometry Box {}
}
#-----cut mark------
Which looks like:

Now let's play with the textureTransform field of the Appearance node. A textureTransform node has four fields, center, translation, scale and rotation. The fields are similar in name to some of the field of the Transform node and the idea is the same but in this case they let you modify the coordinates of the texture image. Remember that the image is mapped onto a surface. The textureTransform modifies some of the mapping capabilities.
First let's look at the translation field. Remember that the coordinate system for the texture goes from 0 to 1. The translation moves the texture coordinates, not the image itself. So if we were to translate the texture coordinate 0.25 in the s (horizontal) and 0.25 in the t (vertical) the old 0,0 lower left coordinate system origin shifts one quarter to the right and one quarter up. The effect however is that the image appears to have move 0.25 units from the right and 0.25 from the top. The image moves in the opposite way from what one would thing. No big deal once you get used to it, or do as I always do experiment with the values until you get what you want! The file source is (I will assume you have the cut and paste stuff figured out so no more cut marks!):
#VRML V2.0 utf8
Shape {
	appearance Appearance {
		texture ImageTexture {
		    url "http://web3d.about.com/library/
			    graphics/sandyicon.gif" }
	    textureTransform TextureTransform {
				   center 0 0
				   rotation 0
				   scale 1 1
			       translation 0.25 0.25 }
	}
	geometry Box {}
}
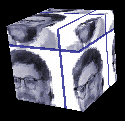
Also note that in the above textureTransform I've included all four field although the center, rotation and scale are the default values and didn't really need to be there.
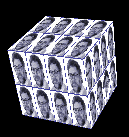
On to the scale field. It too does not have an obvious effect on the texture. The horizontal and vertical values of the scale field correspond to the number of times the image is mapped to the polygon. So the larger the value the smaller the image. Scale values of 4 2 means that there will be four copies of the texture horizontally and two copies vertically (if the repeatS and repeatT are TRUE, the defaults).
#VRML V2.0 utf8
Shape {
	appearance Appearance {
		texture ImageTexture {
		    url "http://web3d.about.com/library/
			   graphics/sandyicon.gif" }
	     textureTransform TextureTransform {
				      center 0 0
				      rotation 0
				      scale 4 2
			          translation 0 0 }
	}
	geometry Box {}
}
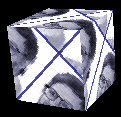
The next field is the rotation field. The value for rotation is, like all other rotation values in VRML expressed in radians. For radians 360 degrees is 2pi which is 6.283, so for our example 45degrees is .7856. Rotations occur around the origin of the texture coordinate system the first image illustrates rotation around the 0,0 origin and the second illustration was created with the center field of values 0.5 0.5.
#VRML V2.0 utf8
Shape {
	appearance Appearance {
		texture ImageTexture {
		    url "http://web3d.about.com/library/
			   graphics/sandyicon.gif" }
	     textureTransform TextureTransform {
				      center 0 0
				      rotation 0.7856
				      scale 1 1
			          translation 0 0 }
	}
	geometry Box {}
}
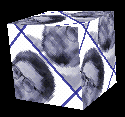
You can get a much more thorough lesson on texture mapping from Cindy Balreich's texture mapping tutorial (Cindy reports to keep trying if you can't get to the site, DSL is on the way). The other way good texture tutorial is Bob Crispen's Controlling Your Textures tutorial. So get out there are start mapping!
One Year Ago in Focus on Web3D (VRML) A SIGGRAPH 98 Travelogue
| Subscribe to About.com's <%=SITE_DISPLAY_NAME%> newsletter | ||
|
Email |
| |
